OK, so the long term goal has been to get more comfortable using my 4×5 and 8×10 cameras to make LF negatives suitable for alternative process printing. To that end, the first half of this year has been learning how to work with my 8×10 and Pyrocat-HD as a developer. So far, so good.
On the alt-process front, I started with cyanotype because it is cheap and quite forgiving. I’ve also played with salt-printing. More of that to come now that I have a better handle on the negative making process. And I’ve started work on improvements to the darkroom to make things a little easier. Working in a converted bathroom can be a bit challenging sometimes.
But for some time now I’ve been reading up on gum dichromate (sometimes called bichromate, usually in the older literature but the accepted modern chemical name is dichromate so I’ll try to stick with that). I’ve been lurking on the alt-process list and reading just about everything I can get my hands on. First let me thank the gum printing regulars over at the alt-list. Always a good read and so far every question I’ve had pre-printing session I’ve found an answer in the list archives. http://www.usask.ca/lists/alt-photo-process/
Second let me also say “damn you all” to the same people for making this sound so appealing. Argh! There goes my last 7 1/2 minutes of free time! Oh well. 🙂
So, while waiting for my single color kit to arrive from Photographer’s Formulary (www.photoformulary.com by the way) I decided to look in my current supply of chemistry. Why get the kit by the way when it is pretty easy to get all the chemicals individually? Well, after a quick check on cost, turns out the single color kit is pretty economical. But back to my chemistry supply, turns out I have a 1g packet of potassium dichromate that I had bought thinking I might use a weak solution for contrast control in cyanotype and salt-printing.
Math time! For gum dichromate you need a dichromate, usually aluminum or potassium. In both cases, you usually use (but not always) a saturated solution. For potassium dichromate, that is about 13% at room temperature. So, I have 1 gram of chemical, how much water to make a saturated solution? 0.13 = 1 / x and so x = 8ml. OK, I rounded things a bit but close enough. 8ml of solution is more than enough to make several 4×5 prints and play around.
Next problem is paper sizing. Three simple solutions to this. First, don’t bother, just use the factory sizing. OK for single coat, may be a problem for multiple coating. I’ve been warned! Second, use gelatin. A single coat gum can probably get away with unhardened gelatin sizing but the use of a hardening agent would be better. I don’t have any formaldehyde, formalin or glyoxal. However the PF kit comes with glyoxal so I’ll try that later. And finally, doing a lot of reading I’ve come across the suggestion to use gesso diluted 1+3 or 1+4. Gesso is cheap and easy to find. Hobby Lobby even happens to have a 50% sale on art supplies right now. So gesso it is for a first look at sizing.
Gum arabic is the colloid for this “emulsion”. So I’ll need a little of that. And of course that too is 50% off at Hobby Lobby so I picked up a small bottle of the Windsor & Newton branded stuff.
Two more issues, pigment and paper. Everybody says to use high quality pigment. Easy, again Hobby Lobby is including the Windsor & Newton pigments in he 50% off sale. Small tube of Davey’s Grey. I think the PF kit comes with lamp black. Another reason for choosing Davey’s Grey is some anecdotal evidence I found that it clears quickly. Good choice for experimenting!
Last is paper. I have some nice Weston Diploma Parchment but I want to save that until I have a better grip on technique. In the past with cyanotype and salt prints I’ve had good luck with some of the $4 generic pads from Hobby Lobby. So once again I’ll just try that.
Oh, and a couple of new foam brushes and some vinyl gloves for mixing. Already have those.
1) Pre-shrink the paper. Discussion on the alt-list about this and strong argument made to not bothering with the hot water + 1 hour method. Just soak the paper for a while. It can start as hot water but just soak and shuffle. So I soak and shuffle. Then hang to dry.
2) Mix up potassium dichromate solution. Done! Store in glass bottle. I have lots of little ones with dropper-stoppers. Done!
3) Size some paper. OK, since I’ve only got one color to play with and for a first test I was going to do a single coat print, I can size a few sheets of un-shrunk paper while the other stuff dries. Gesso mixed 1+3 with distilled water. Soupy stuff! Paint on evenly with clean foam brush and dry. Done.
4) Did I mention I was just wanting to experiment? So that means pull out a sheet of paper, and just coat it. No shrink, no size. Just 1:1 gum and dichromate. Then into a little plastic shot glass I place about 1″ worm of Davey’s Grey and mix in the gum and dichromate.
5) Coat paper. Another clean sponge brush. Just like the literature says, coat evenly, quickly and don’t worry too much as it tends to even out a bit as it dries. Yes, it does even out a bit as it dried but it was still splotchy. Cheap paper + unpolished technique = splotchy coating, remember that.
I let the coated paper dry for a while and then made the sandwich in the printing frame and exposed for about 15 minutes over the UV blubs. Unlike cyanotype and salt-printing you don’t get a POP image to judge, at least I didn’t with the Davey’s Grey mix. Just flying blind here but the time felt right.
Float the paper in clean water face up for a minute or so. Som’ bitch I see the image starting to form up as pigment floats off. Carefully move the print to a second tray of clean water and let it soak face down. I would check it about every 5 minutes over the course of an hour. Also during that time I coated two more sheets, one sized but unshrunk and a third shrunk but unsized. And based on what I was seeing after about 30 mintues of developing in the first print, backed off the exposure to about 6 minutes. Probably too little exposure (guilty of changing multiple variables).
All in all, a long evening but very productive! This is great! Start a new section in the lab notebook and start recording results so I can get some predictable results!
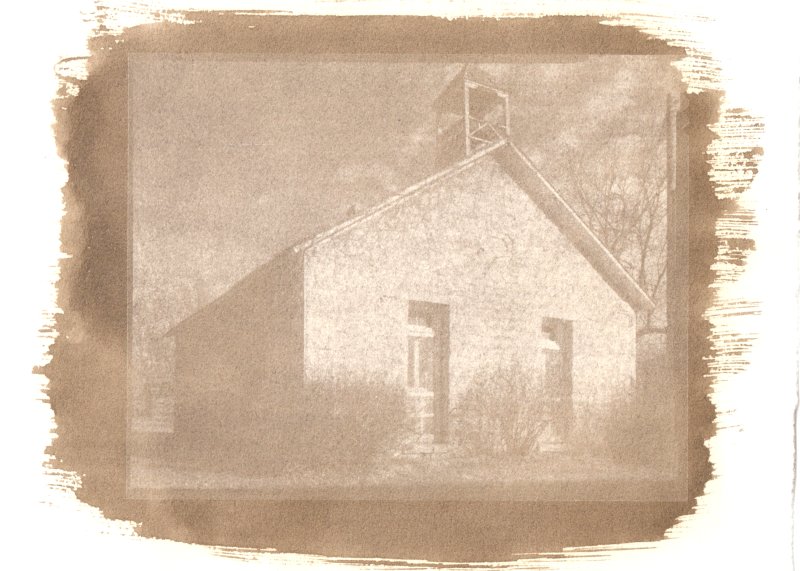
After all this rambling, here is a scan from my first sheet. I cropped it a bit and a slight adjustment post scan so that it matched on my monitor. As always, YMMV! Maybe a bit over developed as you can see how pigment has floated away from medium high tones, exposing brush strokes. Oh well, what is most important to me is that it WORKED! Ha!

No silver was harmed in the making of this print… 😉


You must be logged in to post a comment.